
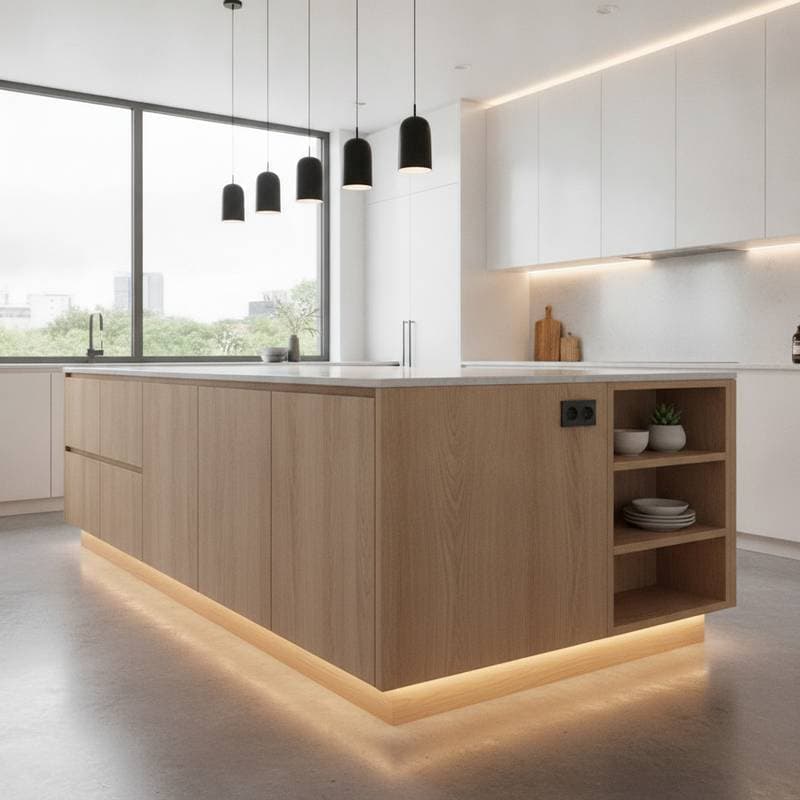
Floating Kitchen Islands Deliver Better Flow and Storage
A floating kitchen island solves layout constraints while preserving full functionality. It improves circulation, introduces adaptable storage, and maintains an open visual profile through precise construction details. Unlike a conventional island with a heavy, floor-to-counter enclosure, a floating design creates a visual pause between the cabinetry and floor. That small change can make a compact kitchen feel lighter without sacrificing preparation space or everyday convenience.
Project Overview
Residents: Family of four who prepare meals together regularly
Setting: Suburban kitchen measuring 260 square feet
Design support: Studio Frame Interiors with owner-built elements
Photography: Lena Morris
The original fixed island restricted movement and blocked light. The replacement structure rests on a recessed steel frame that creates a continuous shadow line at the floor. This change opened aisles to 40 inches on every side while retaining the same overall footprint.
The planning process focused on how the family uses the room rather than simply increasing storage. Clear routes were preserved between the refrigerator, sink, range, and dining area. The island also received enough seating room for casual meals, homework, and shared preparation, allowing it to serve several purposes without becoming a traffic obstacle.
Previous Limitations
The earlier island rested on a solid base that interrupted cleaning paths and reduced perceived space. Storage compartments sat too deep for easy access. A single ceiling fixture left work surfaces shadowed during evening hours.
Its enclosed base also created a visual barrier between the kitchen and adjacent living areas. Family members could sit at the island, but they felt separated from the person cooking. Because the cabinet doors opened into the aisle, more clearance was needed during use. These problems made the island seem larger and less useful than its actual dimensions suggested.
Updated Design
The new island appears suspended above the floor. Warm LED tape concealed in the recessed base produces a soft glow that emphasizes the gap. White oak veneer panels finished in matte polyurethane cover the cabinetry, with grain oriented horizontally to accentuate width. A two-inch quartz top supplies a durable, light-reflecting surface.
Three shallow drawers hold utensils and small tools. A pull-out bin manages waste, and an open compartment stores two stools that tuck fully beneath the overhang. These elements keep the top clear and preserve the floating profile.
The overhang was sized to support comfortable seating without creating a sharp corner in the main walkway. Rounded outside corners would provide an additional safety benefit in busy households, especially where children move between the kitchen and adjoining rooms. A light countertop also helps distribute illumination, while the natural oak adds warmth against surrounding painted cabinetry.
Construction Specifications
- Frame: Square steel tubing or reinforced 2-by-4 lumber with corner brackets
- Base recess: Four to six inches to produce the shadow line
- Countertop: Quartz or butcher block with 1.5-inch edge thickness
- Lighting: LED tape under base plus two task pendants
- Hardware: Flush-mounted brushed nickel pulls
- Estimated material cost: 1200 to 1800 dollars
The support frame must be anchored securely to the floor and connected to the cabinet structure so the countertop does not shift under pressure. A floating appearance should never mean reduced stability. Before installation, the floor should be checked for level, and the finished height should be coordinated with the adjacent counters and stool dimensions.
Planning Steps
- Map daily routes between sink, range, and refrigerator to confirm the island will not obstruct the work triangle.
- Build a rigid frame first, then attach cabinet boxes while maintaining the required base setback.
- Route power through one support if appliances will sit on the island, and verify compliance with local codes.
- Install full-extension drawers rather than doors to improve access in narrow spaces.
- Apply satin polyurethane to all surfaces and seal every edge against moisture.
Homeowners should also mark the proposed footprint with painter’s tape before ordering materials. Walking around the taped outline while carrying a tray or opening nearby appliances can reveal conflicts that a floor plan may miss. Check dishwasher, oven, and refrigerator doors in their fully open positions, and confirm that seating does not interfere with the primary preparation route.
Storage Enhancements
Drawer organizers keep knives and utensils off the countertop. Pull-out trays position recycling bins without reducing floor clearance. A magnetic strip mounted under the overhang holds frequently used tools. A removable cutting board section allows quick surface changes.
Additional storage can be assigned by frequency of use. Everyday items belong in the shallowest, easiest-to-reach drawers, while serving pieces and seasonal equipment can occupy lower compartments. Adjustable dividers help the interior adapt as cooking habits change. Ventilated sections may also be useful for produce, provided they remain away from moisture and direct heat.
Daily Performance
Homeowners report that the kitchen feels more spacious because light travels beneath the island. The toe kick permits closer stance at the work surface. Sweeping and mopping require less effort since debris moves straight under the cabinet.
The family noted that the island now serves as both preparation area and seating hub. Ingredients can be staged on the quartz top while children sit at the stools, allowing everyone to remain in the same zone without crowding.
The open base also makes visual maintenance easier. A quick pass with a vacuum attachment reaches beneath the frame, while the recessed lighting provides a gentle night glow without turning on the main fixtures. For households that entertain, the island offers a clear serving surface while guests can circulate around it without forming a bottleneck.